

top
We are always adding things to this page. Come back often.
Below are some of the more popular requests for what can be accomplished with the ProMat platform.
[scroll down or click on ‘subject’ to go there]
library
Working with libraries
Libraries are a perfect solution to save products in a folder for quick access without using Advanced Search.

Accessing my libraries
After you sign in and you are on the My Projects landing page, you can click on MY LIBRARIES in the top navigation bar.
Here you can create a “library” of products that you want to keep for safe keeping.
Examples of why you may use a library:
Quickly retrieve products you use repeatedly (adhesives, leveling compounds, waterproofing membranes, etc.)
Quickly retrieve flooring products that are commonly used for a repeat customer.
Quickly retrieve products that you want to be set aside by type of manufacturer or product type.
Create a small palette of products before moving the products to a Project Folder.
How to create a Library
Click MY LIBRARIES In the navigation options (Top Right)s.
Then click Create Library.
Give your library a name and click Save.

How to add products to a Library
Find the product in Advanced Search.
Then click on the product name in the product record. This will take you to the Sec-Intel website.
Click on the button ‘ ADD TO LIBRARY’.
Select your Library and click Save.

How to add a Library product to your Project (Palette)

Managing products in a library
Open your preferred Library.
Simply “hover” over your products with your mouse.
Click the far right square with the plus (+) symbol.
Select the project folder (it will default to your last project)
Add your Designations/Notes and click Save
Your product information + all documents are now in your project folder.
Additional Options
Order a sample of the product
Add the product to another library
Delete products from your library
Go to the product page for that product (click on the product image)
Rename your Library
Customize the Introduction of Submittal Packages
Customized binders makes you stand out from your competitors and impress your clients.
Here are a few examples of documents to consider for customizing your binder:
About our Company
Portfolio of Key Projects
Additional Services
Key Contacts Within Your Company
[Click on each document below to see more detail.]
PDF document - about us
PDF document - PROMOTE additional services
Custom PDF documents inserted as an introduction to your submittal package are professional and easy to accomplish.
Step 1
Create PDF documents you want to have “at the ready” to insert into your binder. Keep these within easy access on your computer’s hard drive.

Upload your custom pdf document
Step 2
When you create a new binder or edit your existing binder, upload your custom PDF documents by “clicking” BROWSE and select your PDF documents from your hard drive.
NOTE: You can only load up to 1mb size documents at a time. If you get an error message, you have exceeded the limit. Option: Upload one document and click ‘NEXT’, then click ‘PREVIOUS’ and upload your next document. Continue this process until all documents are loaded successfully. If you get the error message after your first document, then that document is too large.
Step 3
Rename your PDF document in the TITLE window next to browse.
IMPORTANT: Rename the file in the TITLE window. This will be the name given to the PDF document in your binder. otherwise it will be a URL name including the word “fake”.
Step 4
Click NEXT, and your PDF document will be uploaded.
Step 5
You can then click PREVIOUS to see the documents you have uploaded.
Step 6
Click The check box to add or remove the documents.

select pdf documents to add/remove to your binder
Step 7
Continue working your binder as you normally would.
All PDF documents will remain with this binder (in the order you loaded them) and are always available for you to add or remove.
SEE EXAMPLE OF CUSTOMER BINDER BELOW.
Unlimited PDF documents. A few below to consider:
About Us
Our Projects
Custom Warranty Page
Materials Supplied on This Project
Seaming diagram (2 places)
When should you customize your binders? Always!
Bid documents (Insert About Us PDF documents.)
Submittal Packages (Insert About US and Contact Information PDF documents.)
Negotiated jobs (Insert About US, Additional Services, Labor Warranty, and Contact Information PDF documents)
O&M Manuals (Insert About US, Additional Services, and Contact Information PDF documents)
Closeout packages (Insert About US, Additional Services, Labor Warranty and Contact Information PDF documents)
Here is how the introduction may look in a finished binder.

Finished binder - introduction (first several pages)
Customize the Product Sections of Submittal Packages
This another great way to customize your binder.
By inserting PDF documents between the product sections of your binder you can help create a more professional document.
Here are a few examples of documents to consider for customizing your binder:
Extended Warranty pages
Unique Warranty pages
LEED documents
Seaming diagrams
Alternate Product tabs
Product Schedule
Below are examples of what you may want to insert in your binder:
introduction to product pages
Seaming diagram
LEED documents
PDF Document - special arranty
Custom PDF documents inserted in the product section of your submittal packages are professional and easy to accomplish.
Step 1
Create PDF documents that you want to insert and save them to your computer hard drive.
Click to upload pdf documents
Step 2
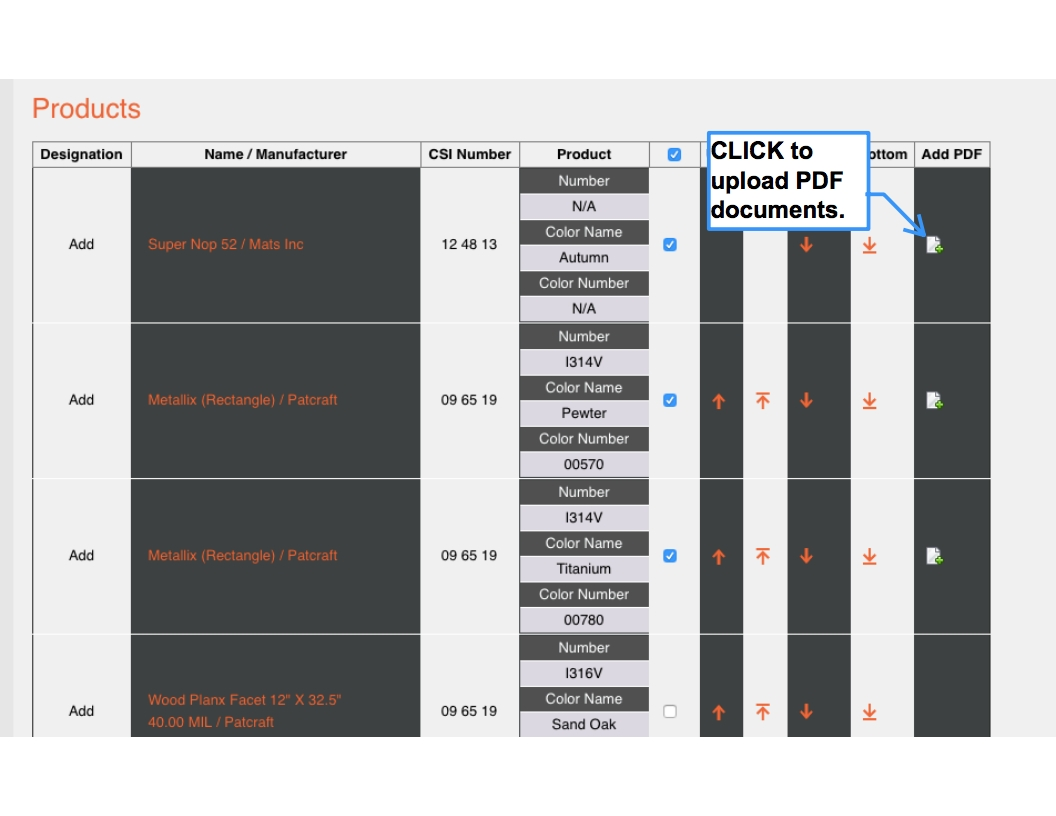
When you create a new binder or edit your existing binder, upload your custom PDF documents that relate to your products at the CSI page.
Here you will find an icon to upload these PDF documents.
NOTE: All documents are placed AFTER the product you have selected.
TRICK: If you want the PDF to precede your product, then insert in the product before.
Step 3

Upload - rename - submit pdf document
Simply click the far right icon in the ‘Add PDF’ column.
In the drop-down Click BROWSE to locate the PDF in your computer’s hard drive.
Add your PDF.
Click Submit to save or Clear to reject your PDF document.
IMPORTANT: Check and rename the PDF file in the TITLE window. This will be the name given to the PDF document in your binder. otherwise, it will create the file name “fake”.
Step 4
Name your PDF document in the TITLE window below.
Step 5
Click SUBMIT
When you have completed this section - click NEXT.
Step 6
Review your document for errors
Click NEXT and download your document. This document will also be saved to your project as a PDF.
SEE THE EXAMPLE OF CUSTOMIZED BINDER BELOW.
PDF Editor software tools
Everyone should have a PDF Editor loaded on their computer if you are going to produce binders.
With a PDF Editor you can:
Insert Pages
Delete duplicate or unwanted pages
Move pages
Edit text
Annotate a manufacturer’s literature
View your document quickly and easily (all 300 pages)
Reduce the file size of your binder (from 82mb to 20mb, as an example)
Merge documents into one document
Split one document into multiple documents.
Many more functions…
Here are some recommended PDF editors to consider and download.
(click the brand links to go to their website for more information)

PDF editing recommendations
Adobe Acrobat Monthly subscription + additional fees per user. Free trial period.
Small PDF Free to download and use. Simple and intuitive. The paid version has no advertising. We use this one at ProMat.
PDF Expert for Mac iOS As robust as Adobe with a one-time cost. Free trial period. We use this one at ProMat.
Here are examples of how you can use a PDF editor with your binders.
Replace our cover page with one of your own - customized just the way you want it!

COVER PAGE
Replace cover page with your own custom cover page.
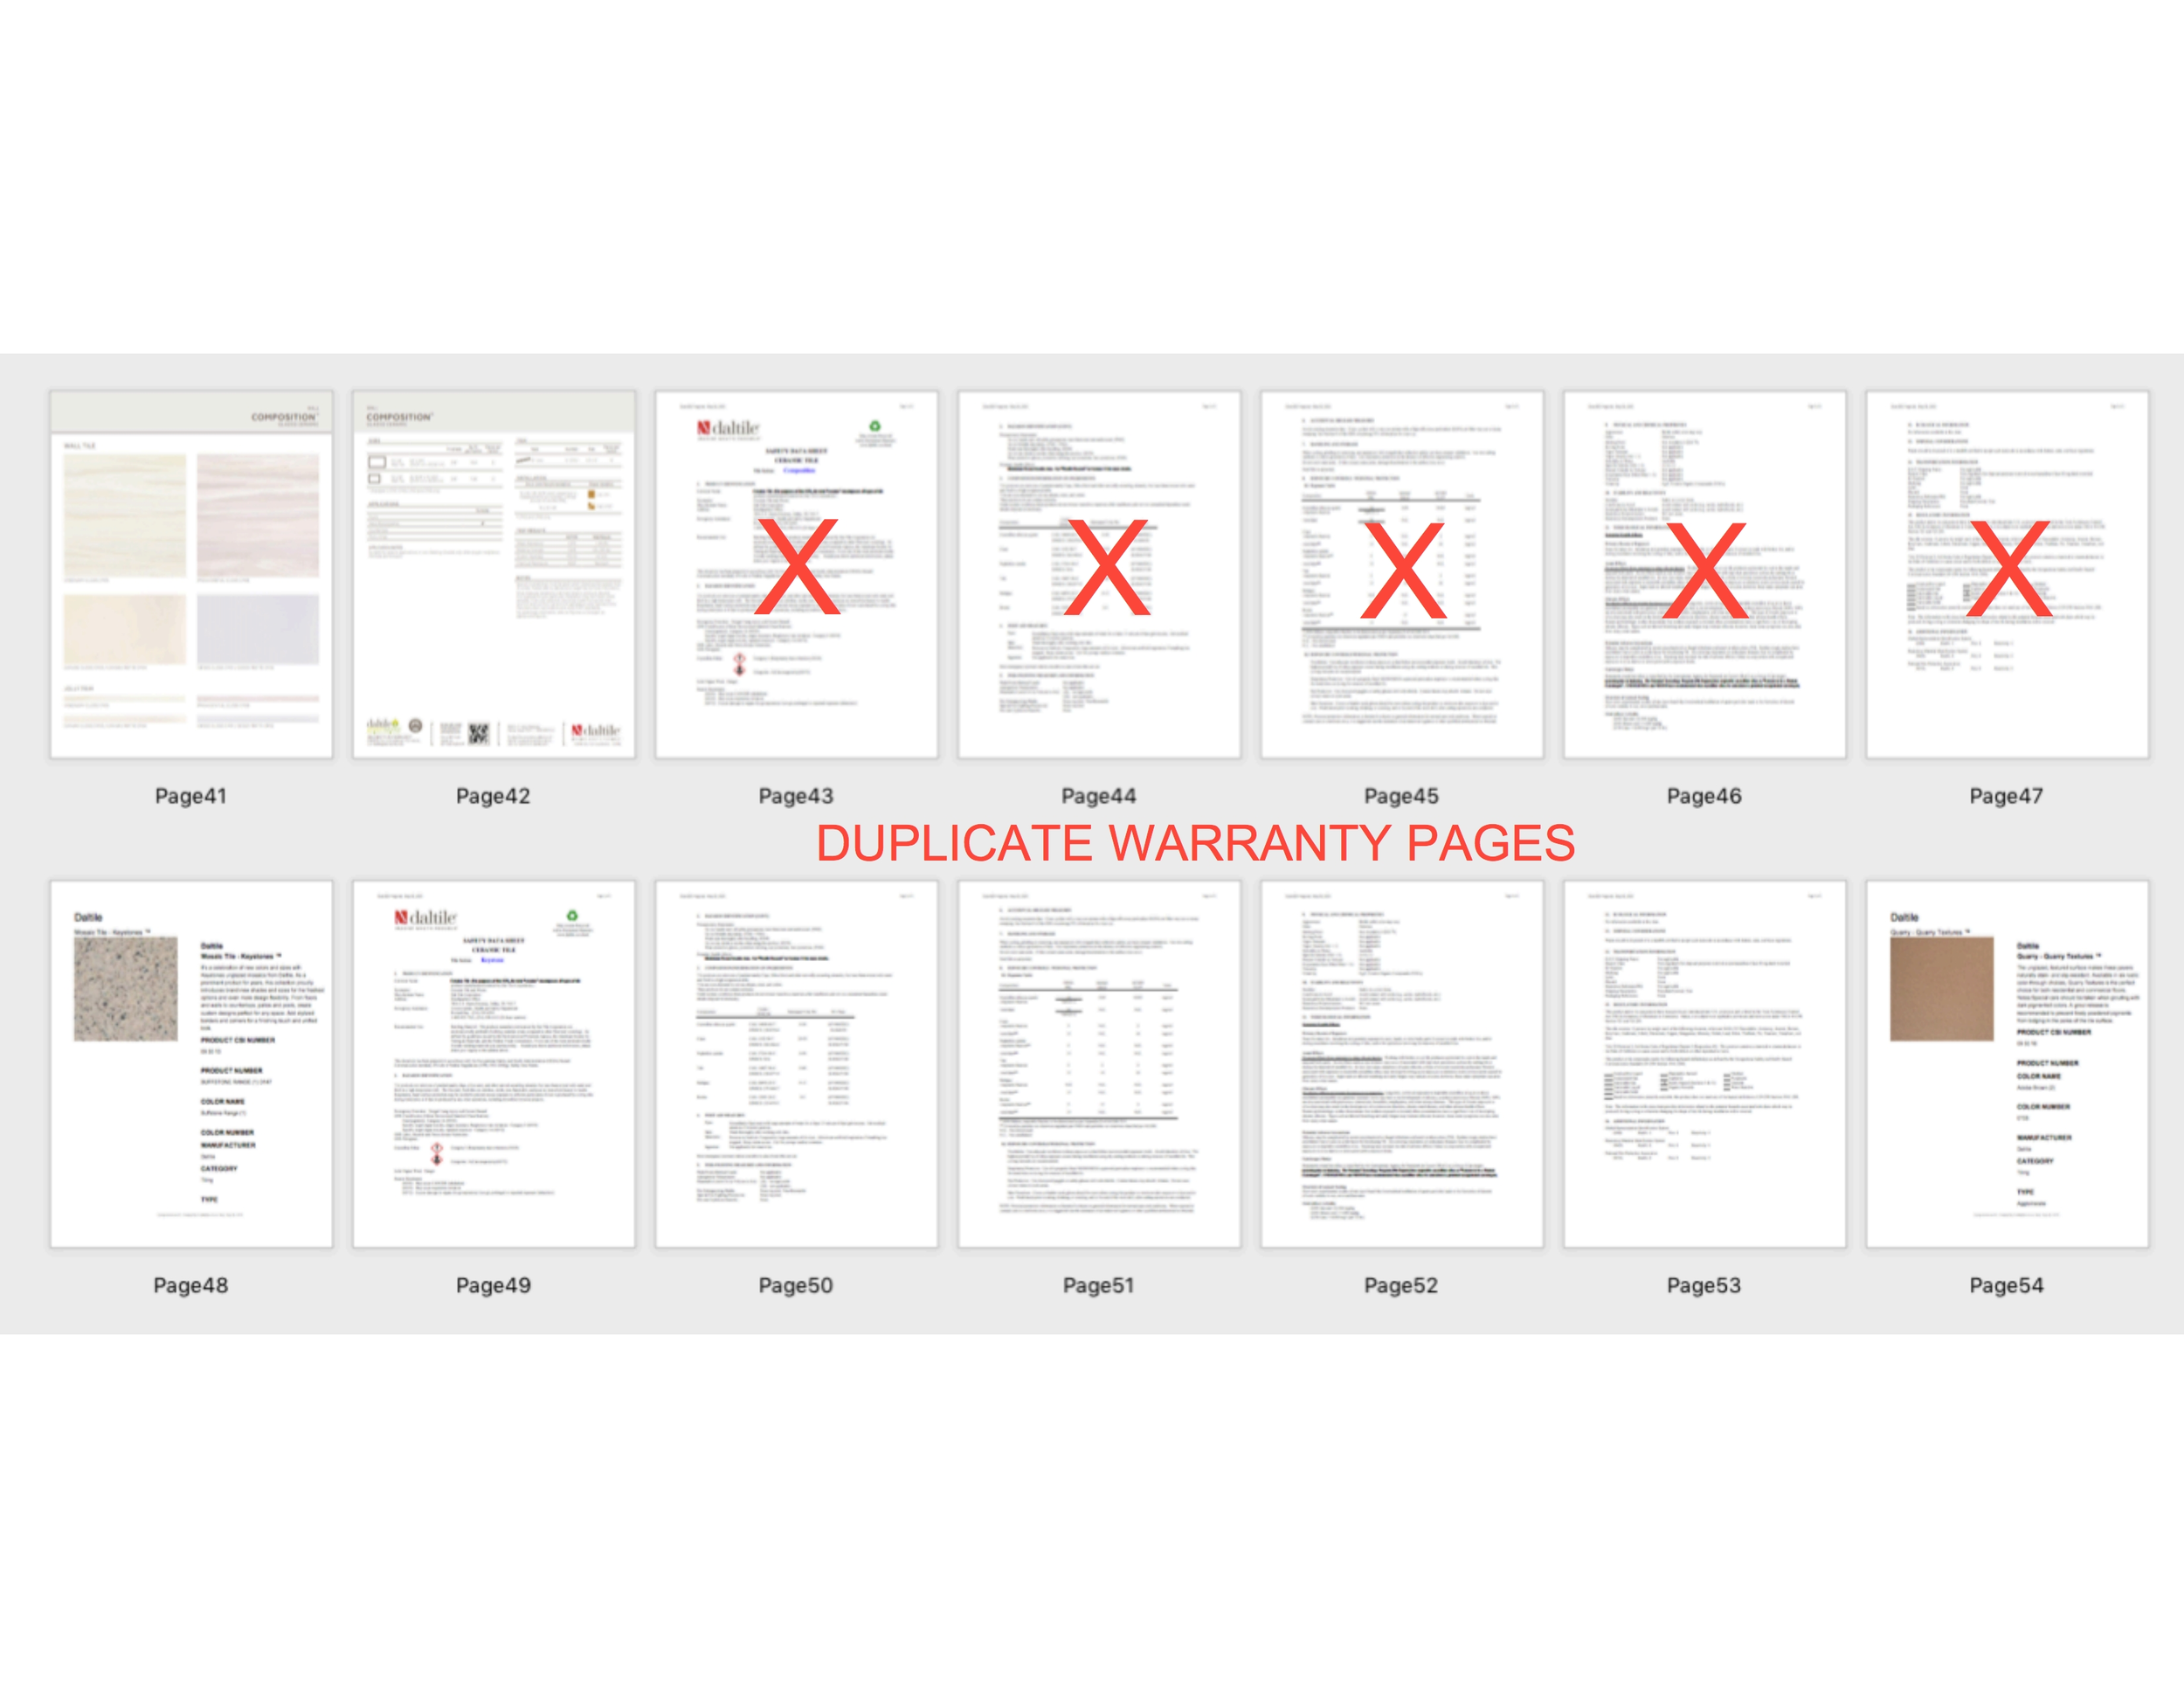
Duplicate pages
Remove duplicate pages from binder (warranty, installation, maintenance pages. from the same manufacturer)

Annotate
Annotate a manufacturer’s literature to identify specific areas for attention.
Designing the Layout of Your Palette/Project
Organizing your Project Folder/Palette may be the best way to keep your materials organized. You can visually spot check all of your materials to insure everything is there.
Simply Click&Hold any product and drag it within your folder.
You can also enlarge or reduce the image by dragging the bottom right corner of the image.

Moving product images

resizing images
You can also download an image of your folder and keep it as a PDF for your files and then insert it in a presentation, document or submittal package.
Simply click the Download Palette Icon to save the image to your hard drive.

Download image
using folder image in documents page
Using folder image in documents
Here is an example of how you can insert the image in a document and then use the document as an introduction to the product section of your submittal packages.
Go HERE to learn how to insert documents in binder.
[click image to enlarge]
How to Manage Change Orders.
Watch videos 1 & 2


